Chapter 5 – Ultimate Chastity Owner’s Manual
Congratulations on your purchase of the Ultimate Chastity Device, (UCDm) Male version 2.4. By the time you receive this, the various components should have been implanted in your male by one of our companies trained and approved surgeons.
Please read this guide carefully as this is a complex and powerful “system” which requires care in its use.
Terminology:
UCDm = Ultimate Chastity Device Male version. Also sometimes called “the device.”
Keyholder = the person who knows the encryption code that, when entered the UCDm app will control the UCDm.
Keyholder Encryption Code = Each UCDm has a unique Encryption code. This code will be supplied verbally to the Keyholder following purchase. It is highly recommended that the Keyholder never write down this code or give the code to anyone. Memorize the code. If the keyholder forgets the code they can recover it by calling Ultimate Chastity Support and proving their identity - however, this code recovery process can take some time and will not be hurried just because a sub may be suffering unintended shocks. Memorize the code!
sub = the male into which the UCDm has been implanted and who’s behavior is controlled by the Keyholder using the UCDm.
- Disclaimers
- You agree to absolve Ultimate Chastity, Inc, its agents and officers, the installing surgeon and operating room staff of any and all liability for misuse of this device.
- Ultimate Chastity, Inc. cannot be responsible for any mental health issues resulting from prolonged chastity, teasing or other sexual denial caused by the owner of this device in its use.
- Healing Period
- The device cannot be used for 14 days following implant surgery. Such use may cause the male into which it is implanted to damage the incisions, stitches or the device itself.
- You must make an appointment for a follow-up appointment with your surgeon at about 14 days to receive clearance for its use. At that time your doctor will enable the device.
- Before the follow-up appointment, please read this manual carefully and be prepared to ask your doctor any questions you may have. Our doctors are highly trained in the implantation and use of the UCDm. See also – Customer Support below.
- Understanding the Ultimate Chastity Device
Components – The UCDm consists of five main components which are surgically implanted into your male:-
Control Cylinder – 2 inches long and ½ inch in diameter, the control cylinder is a marvel of miniaturization and relies on many technologies developed for the Cellular Telephone industry. The control cylinder includes the following circuits:
- An Atom processor running at 2.6 GHz. The processor monitors and controls all components and functions below.
- 100mb RAM
- Low Energy Blue Tooth radio – capable of ranges up to 100m (330 ft.) this circuit provides connectivity with the Ultimate Chastity App (see below) as well as geo-fencing capability (the ability to detect if the male leaves the proximity of a cell phone.)
- GPS receiver – location services, continuously providing the location of the UCDm with accuracy of within plus/minus 40 ft. on average.
- Accelerometer and other extremely sensitive position sensors. These sensors, similar to those in a smart phone, can tell if the unit is moving, in which direction it is moving and how fast. This allows the software in the UCDm the ability to track the male’s position (horizontal or vertical, face up or face down) as well as motion (walking, running, climbing or descending).
- Low Power high frequency Sonar unit that is capable of detecting surfaces such as floors and walls as well as detecting the density of such surfaces. For example, the radar unit, along with position sensors, can detect if the male is lying flat on a floor or is on his knees. It can also detect if he is laying on a hard surface or a bed by the density of the surface.
- Miniature Tens Unit – used to generate electrical current to the Penile Pain Wires and Testicle Pain Mesh described below.
- Digital to Analog and Analog to Digital converters to sense and control external devices (described below).
- Battery Cylinder – also 2 inches long and ½ inch in diameter, the battery cylinder contains high-quality, long-life lithium-Ion batteries and a charging circuit.
-
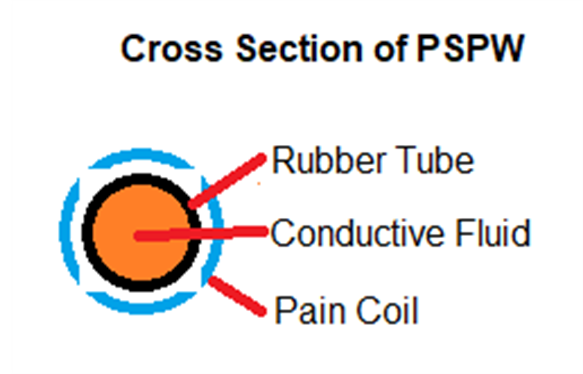
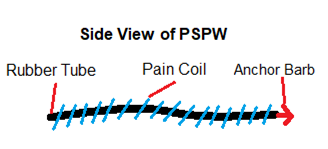
Penile Strain Gage and Pain Wires (PSPW) – The development and manufacture of the PSPW is what makes the Ultimate Chastity device possible. The PSPW is a pair of sensors, custom cut to length for each male. The PSPW consists of a thin rubber tube, 3mm wide and typically 2.5 cm (1 inch) long at rest. The tube is highly elastic and can stretch to 7 times its at-rest length with very little force. The tube is filled with a mercury-free metallic electrically conductive fluid (a gallium-indium alloy). This alloy is safe for humans as Indium has been used in dental fillings for years and Gallium is a trace nutrient.
As the tube is stretched, the diameter of the interior of the tube decreases, changing the resistance of the conductive fluid. This conductance can be measured with great accuracy to determine the exact length to which the PSPW has been extended.
The PSPW has a coil of special alloy wire around the entire external length of the tube. This coil resembles a tiny version of the children’s “Slinky” toy and can expand and contract along with the tube. This coil is connected to the first channel of the Miniature Tens Unit described in 3) a) i) (7) above.Finally, the PSPW has a small surgical steel barb mounted on the end of the tube and used during installation as described in section 4 below.
- Testicle Pain Mesh (TPM) –Two sacks of surgical stainless steel wire mesh are used to encase each testicle inside the scrotum. These sacks are wired to the second channel of the Miniature Tens Unit described in 3) a) i) (7) above. The wires are routed under the skin.
- Charging Coil – A charging coil is mounted just under the skin of the Male’s abdomen. The UCDm includes a low voltage charger mounted on a belt, with a matching adapter (external coil) to safely charge the Battery Cylinder.
-
Control Cylinder – 2 inches long and ½ inch in diameter, the control cylinder is a marvel of miniaturization and relies on many technologies developed for the Cellular Telephone industry. The control cylinder includes the following circuits:
- Installation and Location of Components
- The UCDm is installed by a company trained and certified surgeon in an out-patient surgical suite. Surgery usually takes about three hours, and the patient can usually go home that evening.
- Your surgeon will brief you on post-surgical care and limitations and let you know what post-surgical follow-up is required.
- In general, you can usually expect at least a three-week recovery period before the device can be activated.
- Charging
- First use:
Before first use, the device should be charged to 100%. - Charging Frequency:
In normal use most keyholders have found that charging is only required every two or three days. More frequent charging may be required if the sub must be punished with frequent shocks. However, even under heavy and frequent punishment, the device should not need to be charged more than once per 24 hours. - Charge Reminder:
Once activated, when the device reaches:- 25% charge the UCDm will apply a level 1 (mild tingling sensation) to the testicles every minute until charging is initiated.
- 20% charge the UCDm will apply a level 3 (sharp shock) to the testicles every minute until charging is initiated and a text will be sent to the keyholder.
- If 15% charge is reached, the UCDm will apply a level 5 (debilitating) to the testicles every five minutes and a text will be sent to the keyholder.
- The keyholder can disable or delay the shocks using the app if desired should the sub be unable to reach a charger.
- Charging Disk:
Every UCDm comes with a 12v power supply with a six-foot cable, a two inch black charging disk, and a special Velcro belt with a pocket to contain the charging disk.
To charge the UCDm:- Plug the power supply into an outlet
- Place the charging disk on the correct spot on the sub’s abdomen. Some keyholders opt to have a charging symbol tattooed on the sub’s abdomen in the correct spot, others simply move the charging disc around until a beep is heard indicating charging has begun.
- A full charge from 20% to 100% takes just over two hours, however most subs will simply wear their chargers all night.
- The supplied Velcro belt can be used to hold the charging disk in the correct position while the sub sleeps.
- The app has an optional setting that will shock the subs testicles, at any level the keyholder sets, if charging stops before the device reaches 100% charge. This feature is helpful for subs who toss and turn at night and may dislodge the charging disk.Warning – take care in setting the shock level on this feature as a simple power failure can stop charging.
- First use:
- Cell Phone Apps
Both the sub App and the Keyholder App are extremely simple to set up.- Downloading
The apps can be downloaded from the app store for either major brand of cell phones. - The sub App
The UCDm sub app must be set up on the subs phone, which must be kept in Bluetooth range of the UCDm device at all times. The subs phone must be on a cell service data plan OR on a WiFi connection at all times.- Initial pairing with device
Select “Paring” from the app menu and follow the instructions on screen to pair the UCDm with the app. - If the app is unable to reach the internet (and the Ultimate Chastity Inc. servers) or if the app is unable to pair with the UCDm you will receive error messages. The most common reason for pairing failure is lack of sufficient charge on the UCDm.
- To disable pairing, select “UnPair” from the app menu. The keyholders special code is required to unpair the device.
- If the sub’s cell phone loses internet connection for more than five minutes or is turned off, the UCDm will:
- At 5 minutes of no contact the UCDm will apply a level 1 (mild tingling sensation) to the testicles every minute until connection is restored.
- At 10 minutes the UCDm will apply a level 3 (sharp shock) to the testicles every five minutes until connection is restored.
- While the UCDm is out of connection with the sub’s cell phone or the internet, all programming and settings applied to the UCDm will remain active.
- Once paired, there are no other options for the sub app except to unpair. The app is intentionally simple. There are some optional displays that appear on the app’s screen, these are described under the Function Menus below 6) c).
- Initial pairing with device
- The Keyholder App
The UCDm Keyholder’s app must be set up on the keyholder's phone which must be on a cell service data plan or a WiFi connection at all times.- Login
When first run, the Keyholder app will request the special Keyholder Encryption code you were given by your surgeon. The app uses this unique code to identify you to the Ultimate Chastity servers that will connect your app to the UCDm device. - Security
- On the security screen, you must choose a password. The password must be at least 12 characters long, contain upper case letters, lower case letters, numbers and special characters. No two characters may repeat consecutively. Select carefully. You’re your password complex, hard to guess and NEVER let your sub see you enter the password. Do not reuse passwords. Change your password often.
- You may choose to enable biometric (Face ID).
- Ultimate Chastity recommends you NOT enable Face ID. While Face ID can be very convenient, it may be possible for your desperate sub to point your phone at your face while, for example, you are sleeping. If you choose the Face ID option, we recommend you enable the tone on login option. This option will cause a sharp, loud tone to sound following each Face ID.
- Setup Menu
- Pairing – this screen allows you to pair optional accessories such as the Toe button and Tags (see section (d) Optional Hardware below)
To pair, make sure the optional devices are on and within a few feet of the sub’s groin. The device should appear on the screen, select and assign each device a number from 1 to 10. This number will be used to refer to the device in Functions below. - Misc. Setup
- 12 or 24hr clock
- Home WiFi UID
- Home WiFi Password
- Defaults – this screen allows you to set default values for various Functions below. Defaults may be adjusted in specific functions but setting default values can save time in enabling functions. Please read the entire manual so you understand how each of these defaults are used before you set up this section.
- Pairing – this screen allows you to pair optional accessories such as the Toe button and Tags (see section (d) Optional Hardware below)
- Standard Functions Menu
The following are available on the Standard Functions Menu- Chaste
Depressing the Chaste button enables the Chastity function. Beside this button you will see two other buttons:- Schedule
The Schedule button brings up the Schedule screen. The schedule screen contains two options:- Set time till release - you can set a number of years, months, days and hours before Chastity is turned off. When you use this function, you may also choose, using the slider button, to enable a timer display on the sub app. If enabled, when the sub opens his app, all he will see is the number of years, months, days and hours till release.
- Set a release schedule – using the calendar function you can program a release time period. Time periods can be:
- An hour of the day – the sub will be unlocked every day at a specific time.
- A day of the week – the sub will be unlocked at a specific time one day a week.
- A day of the month – the sub will be unlocked at a specific time one day a month.
- Specific days of the year – You may specify specific days on the calendar, such as birthdays, anniversaries, etc. then specify what time of day the release occurs.
- You may specify the duration of a release from 1 minute to 24 hours.
- You may turn on the timer till next release display on the sub’s app.
- Schedule
- Release
The release button turns off the Chastity function immediately. It requires a second entry of the Password to confirm the command EVEN IF Face ID is enabled.- Using the Release button does not disable any times or schedules currently set.
- Pain
The next four buttons directly control the Tens unit output to both the Testicle Pain Mesh and the Penile Pain Wires.- Call Button (Yellow in color) – applies a level 1 shock to the testicles for one second if momentarily depressed. Applies a level 2 shock to the testicles if held down for as long as the button is held. This button is usually used to tell the sub that he is needed by his keyholder, however, you may come to any understanding desired with your sub. The momentary pulses may be used in code, for example one level one pulses might mean come find me when you finish your current task where three level one pulses might mean come here NOW.
- Warning Button (Orange in color) – applies a level 3 shock to the testicles and penis for one second if momentarily depressed. Applies a level 4 shock if held down for as long as the button is depressed. Usually used as a warning if the sub is not responding quickly enough or is doing something wrong.
- Punishment Button (Red in color) – applies a level 5 shock to the testicles and penis for as long as the button is depressed.
NOTE – level 5 for more than a few seconds will cause any man to drop to the ground and curl up into a fetal ball, screaming and clutching at his testicles. Test subjects have tried to tear their scrotum open with their fingernails if this level was applied for more than 15 seconds. It is recommended that severe punishments be administered by the application of a series of five second punishment shocks with 30 seconds to a minute between shocks.
NEVER use the Punishment button unless you are in the same room with the sub. - Pleasure Button (Green in color) – Begins applying a mild current to both the penis and testicles when depressed. This current is designed, by frequency, voltage and pattern to cause sexual stimulation and an erection.
The longer the Pleasure button is depressed, the stronger the stimulation grows.
The pleasure button automatically disables the Chastity function, because of this it also requires a second entry of the Password to confirm the command EVEN IF Face ID is enabled.
To re-enable Chastity, simply press the Chaste button when you are finished with the Pleasure button.
- Chaste
- Programmable Functions Menu
There are six programmable function buttons available on this screen.
To program a button, press and hold the button for five seconds.
Select a name for your function.
Choose from: Position, Geofencing, Routing, Exercise or Combination.- Position
Set the desired sensor readings as follows.
The choices are:- Surface or Tab – this function will control the sub’s distance from either a reasonably solid surface or a UCDm Tab (See section (d) (2). If a Tab is used, the Tab must have been previously paired to the UCDm in the setup section.
Choose Surface or the number of the Tab (1-10) - Horizontal or Vertical – select if you wish the sub to assume a horizontal or vertical position.
- Orientation – Face up or Face down. This setting is optional and is usually only used if a) above is set to horizontal. However, in a Vertical setting with c) below set to control distance from a surface, it may be used to make the sub face towards (down) or away (up) from a wall.
- Distance - Inches from a solid surface or from a Tab (Set the number of inches from 2 to 36). This setting is optional, a setting of 0 disables the distance function.
Typically use 2 inches to place the sub directly laying on or facing a surface.
Use 6 inches if you wish the sub to have their back to the surface.
Use 10 inches if you wish the sub to sit on their heels.
Use 14 inches if you wish the sub on their knees.
Use 34 to 36 inches if you wish the sub to stand.
The numbers may vary with the height and build of your sub so measurements are wise. Have the sub assume the position you are programming then measure from the spot where the top of the penis meets the abdomen to the solid surface. - Announcement. You may develop various methods to notify your sub of the position you wish them to take. These may include verbal or hand signals that you design. Some examples are available on the internet. However, if you also wish to use the app to signal your sub, you may train them to respond to various patterns of level 1 shocks that you design. For example, one long shock might indicate flat on the floor face down. One short, one medium and one short shock might indicate kneel. To set announcement shocks enter a 1 for a short shock, 2 for a medium shock, 3 for a long shock. Up to three numbers may be entered, separated by commas. So a 1,2,1 would be short, medium, short.
- Punishment. Should your sub fail to assume the position you require you obviously need to punish them until they do. Likewise, if they leave the position you require, the UCDm should punish them. Punishments are set in the Punishment boxes.
Set the delay, level, and time for a WARNING. The system will wait the number of seconds set in ‘delay’ before delivering a shock at ‘level’ for the number of seconds set in ‘time’.
Set the delay, level and time for PUNISHMENT. The system will wait the number of seconds following the WARNING set in ‘delay’ before delivering a shock at ‘level’ for the number of seconds set in ‘time.’ The UCDm will continue to deliver shocks at this level and time, waiting the delay between each punishment, until the sub reaches the correct position.
Should the sub leave the required position before the custom function is turned off, the warning and punishment cycle will start. - Movement Restriction. This determines how still your sub must remain. A value can be set from 1 to 5. A setting of 1 will allow the sub to squirm and move quite a bit before being punished. A setting of 5 will mean that any movement detected by the accelerometer beyond simple breathing, including coughing, will trigger a punishment.
- Movement Punishment level. Can be set from 1 to 5 level shock. When more movement than set above is detected, a 1 second shock at this level will be administered followed by a five second wait to allow the sub to settle before movement is measured again.
- Examples
- If you wish the sub to stand, facing a wall and remain very still you would enable the following settings:
Horizontal or Vertical: Vertical
Orientation: Down
Distance: 2 - If you wish the sub to stand:
Horizontal or Vertical: Vertical
Orientation: blank
Distance: 0 - If you wish the sub to lay face up on the floor:
Horizontal or Vertical: Horizontal
Orientation: Up
Distance: 2 - If you wish the sub to sit on their heels on the floor:
Horizontal or Vertical: Vertical
Orientation: blank
Distance: 10
- If you wish the sub to stand, facing a wall and remain very still you would enable the following settings:
- Surface or Tab – this function will control the sub’s distance from either a reasonably solid surface or a UCDm Tab (See section (d) (2). If a Tab is used, the Tab must have been previously paired to the UCDm in the setup section.
- Geofencing
Geofencing is the use of the GPS receiver in the UCDm to keep the sub within a programmed perimeter. GPS is typically only accurate to +/- 40 feet. Therefore this function can be used to ensure a sub stays home, and perhaps stays in a particular room. But it cannot be used to keep a sub in one spot.- Long/Lat.
Enter the longitude and latitude of the center of the area in which you wish to contain your sub. These values default to the sub’s current location to make them easier to set. Or you can use an app like Google Maps to find the longitude and latitude of a specific spot on the earth. - Radius.
Enter the distance, in feet, that you will allow the sub to move from this location before punishment is initiated. Note that a Radius of 0 or 1 typically means the sub has about 40 feet of movement.
If, for example, your home sits on a lot that is 100 feet wide, then if you set the Long/Lat to a location in the back center of the home, the sub should be able to move around the home and the backyard. But if he attempts to leave the lot he will be punished. - Punishment. You should never enable Geofencing unless your sub is already within the Long/Lat and Radius. If they leave this location the system will punish them. Punishments are set in the Punishment boxes.
Set the delay, level, and time for a WARNING. If the sub is outside the perimeter, the system will wait the number of seconds set in ‘delay’ before delivering a shock at ‘level’ for the number of seconds set in ‘time’.
Set the delay, level and time for PUNISHMENT. The system will wait the number of seconds following the WARNING set in ‘delay’ before delivering a shock at ‘level’ for the number of seconds set in ‘time.’ The UCDm will continue to deliver shocks at this level and time, waiting the delay between each punishment, until the sub moves back inside the perimeter.
- Long/Lat.
- Routing
The routing function is similar to the Geofencing function except that it requires the sub to be at a specific Longitude and Latitude with a specific time window. Multiple locations may be set per route.- Long/Lat.
Enter the longitude and latitude of the center of the area in which you wish your sub to go. You can use an app like Google Maps to find the longitude and latitude of a specific spot on the earth. - Radius.
Enter the distance, in feet, that you will consider this location. Note that a Radius of 0 or 1 typically means the sub must be within 40 feet of the Long/Lat. - Set an arrival time window – using the calendar function you can program an arrival window. Windows can be:
- One time – a single use on a specific day and time.
- A time of the day – the sub must arrive every day at a specific time.
- A day of the week – the sub must arrive at a specific time one day a week.
- A day of the month – the sub must arrive at a specific time one day a month.
- You may specify the duration of the arrival window from 1 minute to 24 hours.
- You may turn on a timer that will display on the sub’s app how long until the sub must arrive.
- Punishment. Make sure that your sub has time to reach each location on your routing. If not, you may leave them in significant pain, in public.
Punishments for failure to reach a desired location within the arrival window are set in the Punishment boxes.
Set the delay, level, and time for a WARNING. If the sub is outside the routing location perimeter, the system will wait the number of seconds set in ‘delay’ before delivering a shock at ‘level’ for the number of seconds set in ‘time’.
Set the delay, level and time for PUNISHMENT. The system will wait the number of seconds following the WARNING set in ‘delay’ before delivering a shock at ‘level’ for the number of seconds set in ‘time.’ The UCDm will continue to deliver shocks at this level and time, waiting the delay between each punishment, until the sub reaches the routing location perimeter. - Add another routing. Use this button if you wish to add a second location to this routing function. You may add an unlimited number of routings however, design carefully and make sure your requirements are realistic even given unexpected traffic, transit delays, etc. Setting up unrealistic routings with high punishment values can result in someone mistakenly calling Paramedics or the Police to attend to your sub.
- Long/Lat.
- Exercise
The exercise function uses the UCDm’s onboard Accelerometer to determine the amount of exercise the sub is engaged in.- Start. Using the calendar function, set the start date and time of the exercise period. You may also set the start to “Follow” meaning the exercise routine is to start immediately upon the completion of the routine above it.
- Duration. Set the number of minutes the sub must exercise.
- Intensity. Set the threshold of motion the sub is required to maintain, from 1 to 5.
0 = See (d) below)
1 = a slow stroll
2 = an average walk
3 = a slow jog, jumping jacks, or similar activity
4 = a fast jog, squat thrusts, or similar activity
5 = a sprint. - Recorded pattern. Optionally, in place of intensity you may record your sub going through an exercise routine that you specify and supervise. Recorded patterns are extremely powerful. Because the UCDm knows the horizontal and vertical orientation of the sub as well as direction of movement, it can detect the movement associated with jogging as well as the movements of exercises such as pushups, pullups, etc. A recorded pattern can be used to run a sub through a complex series of warmups, calisthenics, jogging (cardio), and cool down.
- Press the Record button and have your sub begin their exercise routine.
- When they have finished the routine press Stop
- Give the routine a name and press save. You may save up to 10 routines.
- Select a saved routine.
- Punishment.
Punishments are set in the Punishment boxes.
Set the delay, level, and time for a WARNING. If the sub is not exercising at the desired level of intensity or replicating the Recorded pattern, the system will wait the number of seconds set in ‘delay’ before delivering a shock at ‘level’ for the number of seconds set in ‘time’.
Set the delay, level and time for PUNISHMENT. The system will wait the number of seconds following the WARNING set in ‘delay’ before delivering a shock at ‘level’ for the number of seconds set in ‘time.’ The UCDm will continue to deliver shocks at this level and time, waiting the delay between each punishment, until the sub reaches the required level of exercise. - Tips.
- Make sure any routine or series of routines start with adequate warmup and stretching.
- Make sure that your sub has memorized and can follow a recorded pattern before you require them to do so alone.
- Set reasonable punishment levels. Too high a punishment may make it impossible for the sub to resume exercise at the required level.
- Position
- Combination
The UCDm allows the keyholder to create combination functions that are a combination of the standard functions described in section iii) and the custom functions described in section iv).- This function presents a blank area of the screen with the standard and custom functions represented in boxes down the side. There is also a “Delay” box to allow timed delays between functions.
- To create a combination function, drag and drop the first function you wish onto the blank area of the screen. This function will appear in a red box.
- Press and hold the function and the programming screen for that function will appear. When you have set all the parameters for a function the box around that function will turn green.
- Continue to add standard functions, custom functions or delays to the screen. Each new addition will be added below the previously added functions.
- Functions may be re-ordered by simply dragging or dropping them into a different order.
- Functions may be edited by simply pressing and holding the function box for a few seconds.
- Future releases of the UCDm Keyholder app will include logic functions to test the various sensors of the UCDm and branch or loop based on the results.
- Notification
Popup windows on the app will notify the Keyholder that commands have been received by the UCDm. Since these functions can be invoked from anywhere in the world, In the event of any punishment, the system will notify the Keyholder on their app that punishment is being delivered. - Logs
Want to see how your sub did on their daily exercise?
Want to check how closely they followed a route?
The log function will give you a detailed list of each of the functions used during the previous week. Use the scroll buttons to scroll through the log or the search button to search for a specific function. - Other Options
UCDm may, from time to time, add additional functions, by automatic download at no charge to current users. If you have ideas for functions, don’t hesitate to message us via the help function in the app.
- Login
- Downloading
- Optional Hardware
- Toe buttons
Some Keyholders like to make their sub believe they have a surgical implant that allows them to punish the sub without needing to access their phone.
This deception can be very useful in generating fear and obedience in your sub while eliminating any hope they may have in avoiding punishment by removing or damaging your phone. Because keyholders don’t really want a surgical implant, Ultimate Chastity has developed the optional toe button.- The Toe button is a very thin, battery powered button. Most keyholders peel up the inner liner on one or more pairs of shoes and insert the button under their big toe in the inner liner of the shoe.
- Firmly pressing and holding the button for three seconds will administer level 5 pain to both the testicles and penis for as long as the button is depressed. The three second delay minimizes the chance that the function is accidentally engaged during walking, however some care must be used to avoid accidental pain.
- Mindfuck. The strength of the Toe button is in its ability to strike fear in the sub by convincing him you can cause extreme pain at any time. Obviously, you will not always have shoes with a toe button on, but he doesn’t know HOW you cause pain, only that you can do it seemingly with your mind. As a result, you should use the toe button several times and brutally while you are training your sub to make him fear it, then very rarely use it but constantly remind your sub that you have the ability to cause pain randomly.
- Location Tabs
You may purchase one or more Location Tabs, small easily hidden Bluetooth transmitters that may be paired to the UCDm.- Battery life. Location Tabs do not have replaceable batteries; however their batteries should last an average of two years.
- Toe buttons
- Customer Support
We’re always here for you 24/365. On the App, under Help is a Contact Us screen that allows you to initiate a chat with one of our highly trained support agent/doms. You may also request we call you to help with more complex problems. - Links for more information
The following links are provided for those who wish for more information about the technologies used in the UCDm.- Indium/gallium-in-rubber ring strain gauge: https://www.google.com/patents/US4258720
- Safety of materials used in the strain gauge: According to the CRC Handbook, the components of EGaIn have ‘‘low orders of toxicity’’.[10] Indium has been used in dental fillings and Ga is a trace nutrient. Indium is also ubiquitous (as a solder) in the semiconductor industry.
- Inguinal Canal: http://teachmeanatomy.info/abdomen/areas/the-inguinal-canal/
- Muffing: http://www.thecsph.org/wotw-muffing/